
Online Help System
Last updated: 09.27.11
The Early Warning Data System is a run-time database application developed by the Texas Comprehensive Center at SEDL based on the Early Warning System Tool (Excel version) developed by the National High School Center. For more information about the EWDS and/or to download the most current version, visit the EWDS home page.
This site provides all the documentation resources associated with the Early Warning Data System. Click a link in the table of contents to view that topic.
Table of Contents
- Download and installation
- Upgrading from a previous version
- Getting help
- Data requirements
- Setting up user accounts
- Setting up a district
- Setting up a campus
- Setting up a cohort
- Manually entering student data
- Importing student data
- Option 1: STUDENT DATA
- Option 2: STUDENT DATA - SEMESTER 1
- Option 3: STUDENT DATA - SEMESTER 2
- Option 4: STUDENT DATA - SINGLE FILE OPTION
- Need help importing student data?
- Viewing cohort data
- Viewing student details
- Defining custom student fields
- Tracking student interventions
- Intervention strategies
- Intervention Tracker
- Pre-defined reports
- Custom summary reports
- Viewing student data tables
- Individual student reports
- Saving student reports to an Excel spreadsheet
- Sending all student data to an Excel spreadsheet
EWDS Specifications
Application name: Early Warning Data System
Type: FileMaker Run-time Database Application
Platform: Windows XP, Vista, Windows 7, Mac OSX
Current Version: 2.2.2
For technical assistance with the EWDS, contact
Eric Waters
Database Associate
Texas Comprehensive Center at SEDL
512-391-6564
E-mail: ewaters@air.org
Web: https://www.air.org/project/texas-comprehensive-center-txcc
Need to Upgrade? Download the latest version
-
Download and installation
- Download and installation
Need to download the latest version? Visit the EWDS download page.
The EWDS can be downloaded and installed by running the EWDS_Setup installer (Windows) or by extracting the .zip files (Mac). After installing the files to your desktop, applications folder, or program files directory, use the following instructions to get started.
Windows XP / Vista / Windows 7
- After downloading and running the Texas EWDS installer, your new software will be located in C:\My Documents\Texas-EWDS\
- To launch the EWDS, click on the desktop shortcut or the "Texas-EWDS" option in your Programs menu.
- If you are prompted for a user name, enter "ewsadmin".
- The application will ask for a user name and password: enter "ewsadmin" and "ewsadmin".
- Create a unique password when prompted.
- The Intro screen will appear.
Mac OSX
- After downloading the "Texas-EWDS.zip" file, extract the files into a folder on your desktop or into your Applications or Documents folder.
- Within the "Texas-EWDS" folder, find and open the application file "Texas-EWDS". Do NOT use the file "Texas-EWDS.USR". You may want to add an alias for this file to your dock or desktop for easy access.
- The application will ask for a user name and password: enter "ewsadmin" and "ewsadmin".
- Create a unique password when prompted.
- The Intro screen will appear.
- Upgrading from a previous version
If you upgrade to a newer version of the EDS (from version 2.xx or higher), use the following instructions to ensure that your student data is imported correctly from the previous version.
PRIMARY METHOD - AUTO IMPORT FROM PREVIOUS VERSION (Windows users)- Open and log in to the NEW version of the EWDS.
- From the main screen, select File > "Import from previous version - auto" (previous data will be imported).
NOTE: At this point, you may be prompted to enter the account name and password for the previous version as each data set is imported. Continue entering your password, if prompted, until the import process is complete. - When you have verified that previous data has correctly imported, DELETE or UN-INSTALL the previous version of the EWDS.
ALTERNATE METHOD - AUTO IMPORT FROM DESKTOP FILES (use this method if you have problems using the primary method or if you are a Mac user.)- Open the OLD version of the EWS Tool. If your desktop shortcut or program files shortcut was replaced by the new version, your old version can be found by navigating to: \My Documents\Texas-EWS-Tool-Windows.v.2.x.x\Texas-EWS-Tool\ and opening the application file "Texas-EWS-Tool".
- Select File > "Export for Upgrade". (data will be exported to your computer's desktop)
- Close the OLD version of the EWDS.
- Open and log in to the NEW version of the EWDS.
- From the main screen, select File > "Import from previous version - desktop" (previous data will be imported).
- When you have verified that previous data has correctly imported, DELETE or UN-INSTALL the previous version of the EWDS.
- Getting Help
 NOTE: Integrated instructions for using the application are available by clicking the blue help buttons on each screen. Clicking the help button will display specific information relating to that screen, including a link to the online help system (this page) which automatically scrolls to the relevant location for
the screen in question.
NOTE: Integrated instructions for using the application are available by clicking the blue help buttons on each screen. Clicking the help button will display specific information relating to that screen, including a link to the online help system (this page) which automatically scrolls to the relevant location for
the screen in question.
The online help system is the most up-to-date information on the EWDS and is updated frequently as new versions are released.
After searching the online help system, if you still require technical assistance with the EWDS, contact Eric Waters at 512-391-6564 or e-mail ewaters@air.org.
Data requirements - Data requirements
The database can import data from various file types generated by a campus or district data management system (DMS). The basic required data include student names and IDs and performance data for semesters 1 and 2. Detailed instructions for data importing are available within the application, from the import screens for student data, semester 1 data, and semester 2 data.
Detailed information on data file structure, field/column naming requirements, and import instructions are available in the PDF document, "EWDS Data Requirements," which is also included in the application's "Documentation" folder. This document contains essential information for the campus or district staff member(s) responsible for extracting the source data from the DMS so it can be imported into the database. (This individual is usually a database administrator or someone from the IT department or technical staff.) With this information, the appropriately formatted files can be generated and provided to the campus and/or district staff who will be working directly with student data in the EWDS.
SAMPLE FILES
Setting up user accounts
Additionally, there are sample .csv files included in the application's "sample_data" folder which can be used as examples of properly formatted files. If necessary, the sample files can be duplicated and used as templates for real campus data by simply replacing the sample data with the real data, making sure NOT to change the column names, and entering the data in the correct columns. The files include samples of data for quarterly reporting, six-weeks reporting, and a single-file option in which all student data can initially be extracted from a single file - and then again as many times as necessary as new data become available. For more information on data files, see the EWDS Data Requirements document. - Setting up user accounts
If more than one person will be working with student data in the EWDS, additional accounts can be set up by the primary "ewsadmin" account. To set up additional admin or user accounts, perform the following steps:
- From the File menu select "Manage Accounts". The USER ACCOUNT SET-UP SCREEN will appear.

- Click the NEW ACCOUNT button.
- Enter the new account name (max 12 characters).
- Select the account type (admin or user). The only difference is that "admin" accounts can access the USER ACCOUNT SET-UP SCREEN.
- Click "OK". The new account will be created with the default password "user".
Other actions that can be performed from this screen include:
- SUSPEND: This turns off access to the system for an account.
- ENABLE: This re-activates access to the system for an account.
- DELETE: This removes an account from the system.
- DEMOTE: This changes an admin account to a user account.
- PROMOTE: This changes a user account to an admin account.
- RESET PASSWORD: This resets the password for an account to the default password "user".
- From the File menu select "Manage Accounts". The USER ACCOUNT SET-UP SCREEN will appear.
- Setting up a district
When the EWDS is used for the first time, district/campus information must be entered. This simple procedure occurs only the first time a user clicks the "Start" button from the intro screen as shown below.
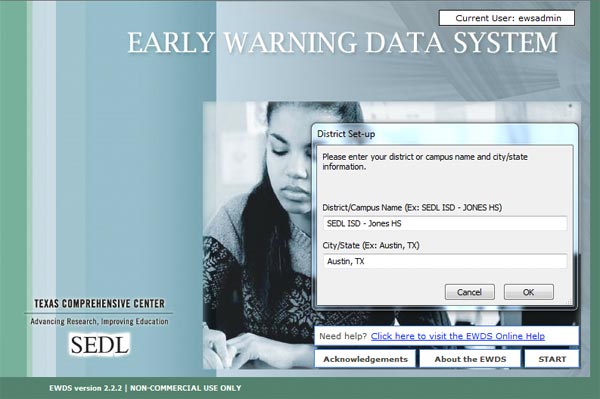
- From the Intro screen, click the "Start" button.
- You will be prompted to enter a district/campus name and location.
- Enter the name of your district/campus (Ex: SEDL ISD - Jones HS).
- Enter the city/state of your district/campus (Ex: Austin, TX).
- Click "OK".
- Setting up a campus
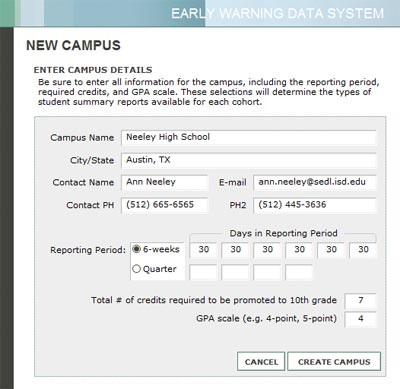
Setting up a new campus is simple and can be performed from the CAMPUS SET-UP screen. Any existing campus and cohort data that may initially appear in the database is for demo purposes and can be deleted using the yellow "x" button next to the campus name. To set up a new campus follow these steps:
- Click the "New Campus" button.
- Fill in the campus information as shown below.
- Click the "Create Campus" button.
NOTE: Be sure to enter all information for the campus, including the reporting period, required credits, and GPA scale. These selections will determine the types of student summary reports available for each cohort.
After a campus has been created, campus information can be viewed or edited by clicking "Show/edit campus" from the CAMPUS SETUP screen.
Adding a cohort - Adding a cohort
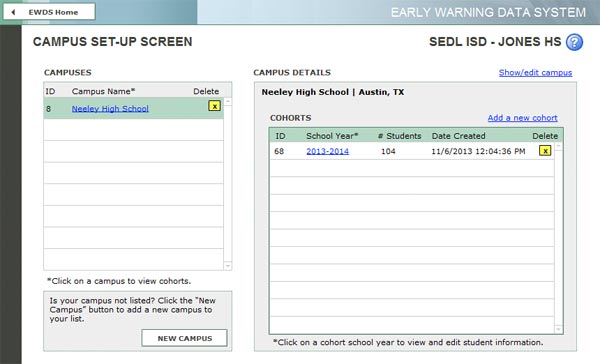
After a new campus is created, it will show up in the list of campuses on the left side of the CAMPUS SET-UP screen. The "Campus Details" section on the right will show the new campus name, location, and a list of cohorts. (The cohort list will be empty when a new campus is first created). To add a new cohort follow these steps:
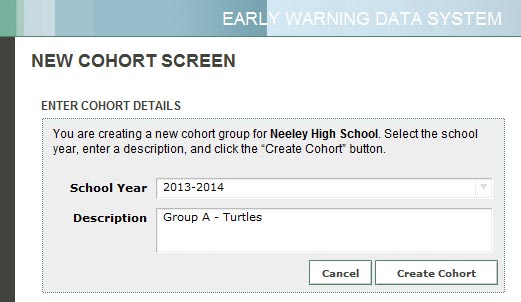
- On the CAMPUS SET-UP screen, click the "Add a new cohort" link. The NEW COHORT screen will appear.
- Select the cohort school year from the drop-down list.
- Enter an optional description.
- Click the "Create Cohort" button as shown below.
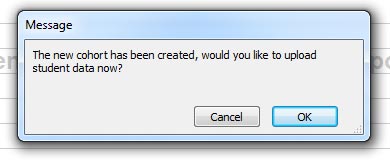 After creating a new cohort, you will be prompted to import the student data for that cohort. If you have the required data file(s) for the student data import available (refer to the "EWDS Data Requirements" PDF document
for information on the required data files), click "OK" and proceed with the student data import, following the instructions on the IMPORT STUDENT DATA screens.
After creating a new cohort, you will be prompted to import the student data for that cohort. If you have the required data file(s) for the student data import available (refer to the "EWDS Data Requirements" PDF document
for information on the required data files), click "OK" and proceed with the student data import, following the instructions on the IMPORT STUDENT DATA screens.
If you wish to enter student data into the database manually, click "Cancel" and proceed with manual entry of the data using the "Manually Add New Student to this Cohort" button. If you don't have the data files immediately available but still wish to import your data at some point, click "Cancel" and use the Data Import buttons to perform the data import at a later time. Keep in mind that student data can be both imported and entered manually into the same cohort group. Whether you choose to import the data or enter them manually during this initial step, you will now be on the tabbed STUDENT DATA screen.
Manually entering student data - Manually entering student data
While the EWDS has the ability to import student data from source files, these data can also be entered manually. To add a new student record manually follow these steps:
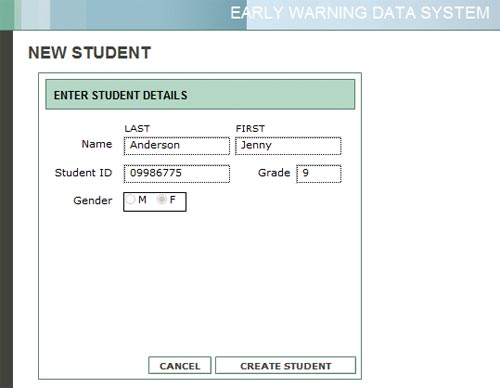
- On the STUDENT DATA screen (Tab 1), click the "Manually add a new student to this cohort" button.
- On the NEW STUDENT screen, enter the name, student ID, grade, and gender of the student.
- Click the "Create Student" button as shown below.
After adding the new student, proceed with entering additional student data on the STUDENT DETAILS screen.
Importing student data - Importing student data
ABOUT IMPORTING STUDENT DATA:
The importing capabilities of the EWDS are provided as a convenience to facilitate importing batches of data from files generated by a campus or district DMS (Data Management System). As noted in the Data Requirements section, there are specific formatting requirements that must be applied to any source data before it can be successfully imported into the system. It is important to remember however, that the database does not require data to be imported from source files. Some or all data can be entered manually using the instructions for manual data entry.The EWDS can perform multiple data imports for the same cohort, allowing new data to be imported as they become available from the campus or district. For example, student data consisting of only the studentID, firstName, lastName, and grade can be imported first. Subsequently, when relavent performance data from semester 1 become available, those data can be imported and merged into the existing records. Any "at‐risk" flags relating to the semester 1 data will activate at that time. Later, after semester 2 performance data become available, those data can also be imported, activating any "at‐risk" flags relating to the second semester. Once data from both semesters 1 and 2 have been imported (or manually entered) into the database, any "at risk" flags relating to the full year will activate, including the key "On Track" or "Off Track" indicator.
WHEN CAN DATA BE IMPORTED INTO THE DATABASE?
Student data can be imported immediately upon cohort creation or at any later time by using the import buttons on the first, second, or third tabs of the STUDENT DATA screen.Regardless of which import option you choose, the data source files must be supplied by the campus or district and available on the local computer BEFORE beginning the import. See the EWDS Data Requirements document for more information on data source files.
There are 4 basic data import procedures described below. Typically, data will be imported using one of two options:- A combination of procedures 1, 2, and 3 or
- Procedure 4
-
IMPORT STUDENT DATA
- IMPORT STUDENT DATA - (FIRST TAB on the STUDENT DATA SCREEN) - This option is the same import process that triggers upon new cohort creation. The fields importing with this option include student ID, names, and grade. To perform this import, follow these steps:
- Upon cohort creation, select "OK" to begin the import process. If you are importing at some later time after cohort creation, click the "Import Student Data" button on the STUDENT DATA screen (FIRST TAB).
- The INSTRUCTIONS screen will appear (see below). Read the instructions and click "Import Student Data". At this point you should be able to position the "Open File" dialog box that appears so that you can read the instructions on the INSTRUCTIONS screen while you perform the import process.
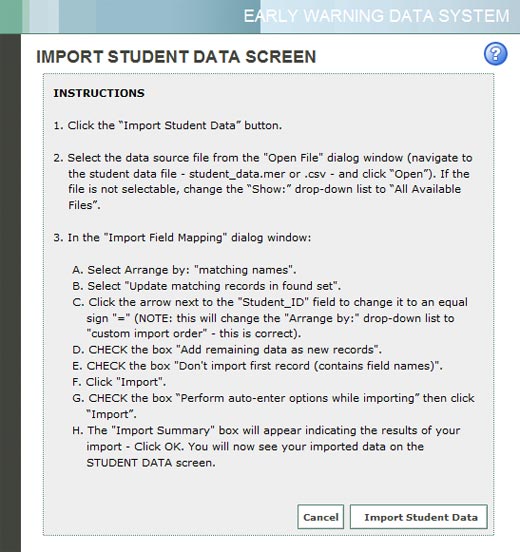
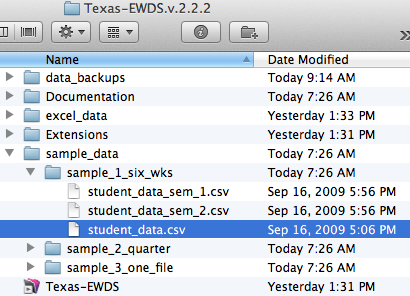
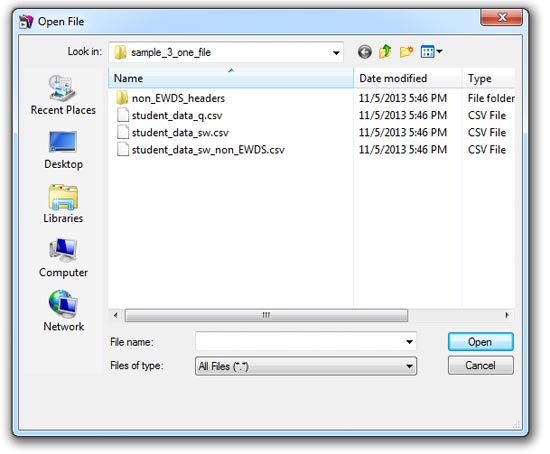
- Select the data source file from the "Open File" dialog window as shown below (navigate to the student data file - student_data.mer or .csv - and click "Open"). If the file is not selectable, change the "Show:" drop-down list to "All Available".
NOTE: The filenames listed for each import option are only the suggested filenames. There is no specific requirement that the filenames match "student_data.mer" or the other suggested names. The column headers however, must be named correctly in the source files for the data to import successfully into the database. See the EWDS Data Requirements document for more information on proper names for column headers in data source files.
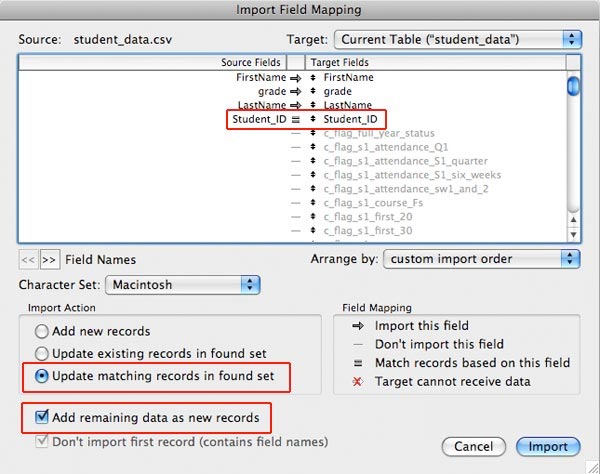
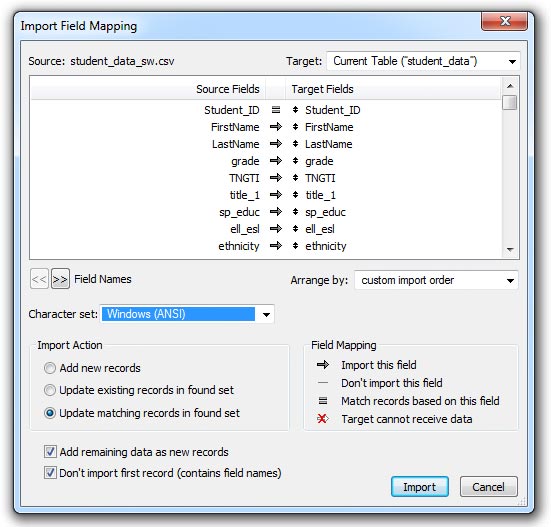
- In the "Import Field Mapping" dialog window (shown below):
- Select Arrange by: "matching names"
- Select Character Set: Windows or Macintosh (based on which version of the EWDS you are using)
- Select "Update matching records in found set"
- Click the arrow next to the "Student_ID" field to change it to an equal sign "=" (NOTE: this will change the "Arrange by:" drop-down list to "custom import order" - this is correct)
- CHECK the box "Add remaining data as new records"
- CHECK the box "Don't import first record (contains field names)"
- Click "Import"
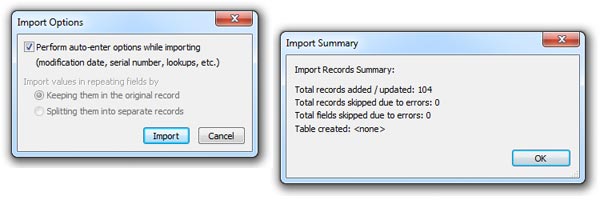
- CHECK the box "Perform auto-enter options while importing"
- The "Import Summary" box will appear indicating the results of your import - Click OK. The imported student data will now appear on the STUDENT DATA screen.
IMPORT STUDENT DATA: SEMESTER 1 - IMPORT STUDENT DATA: SEMESTER 1 - (SECOND TAB on the STUDENT DATA screen) - This option imports semester 1 performance data. To perform this import, follow these steps:
- Click the "Import Semester 1 Data" button on the STUDENT DATA screen (SECOND TAB).
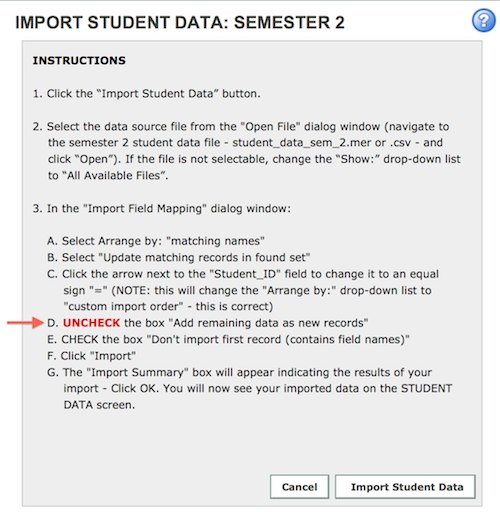
- The INSTRUCTIONS screen will appear (see below). Read the instructions and click "Import Student Data". At this point you should be able to position the "Open File" dialog box that appears so that you can read the instructions on the INSTRUCTIONS screen while you perform the import process.
Please note that this import option is identical with the first import option EXCEPT for step 3D - UNCHECK the box "Add remaining data as new records". Failure to UNCHECK this box on importing semester 1 or 2 data could results in extraneous data being imported into the database. By contrast, this box should ALWAYS be CHECKED when performing the first import option from the FIRST TAB of the STUDENT DATA screen or upon creation of a new cohort.
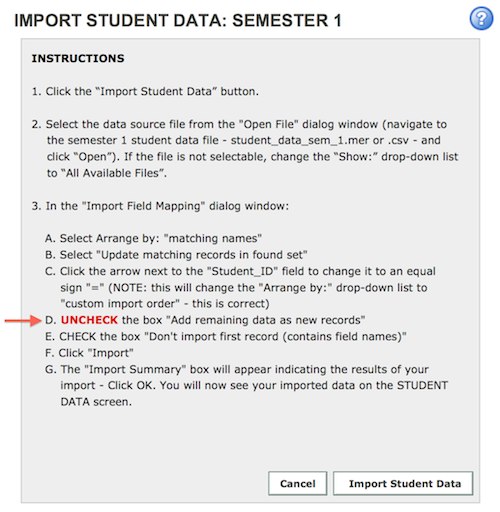
- Select the data source file from the "Open File" dialog window as shown below (navigate to the student data file - student_data_sem_1.mer or .csv - and click "Open"). If the file is not selectable, change the "Show:" drop-down list to "All Available".

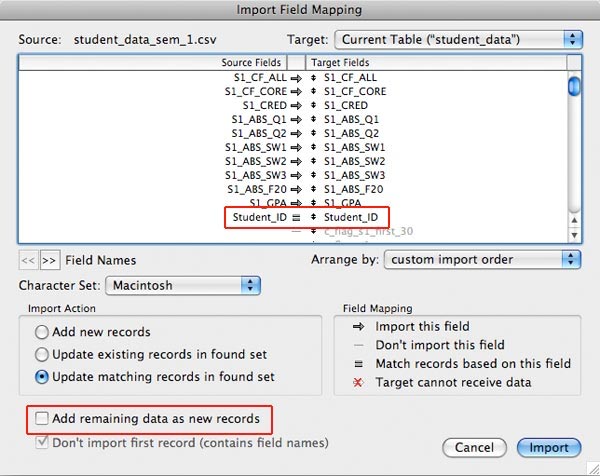
- In the "Import Field Mapping" dialog window (shown below):
- Select Arrange by: "matching names"
- Select Character Set: Windows or Macintosh (based on which version of the EWDS you are using)
- Select "Update matching records in found set"
- Click the arrow next to the "Student_ID" field to change it to an equal sign "=" (NOTE: this will change the "Arrange by:" drop-down list to "custom import order" - this is correct)
- UNCHECK the box "Add remaining data as new records" - NOTE: THIS STEP IS THE OPPOSITE OF THE FIRST IMPORT OPTION!
- CHECK the box "Don't import first record (contains field names)"
- Click "Import"
- CHECK the box "Perform auto-enter options while importing"
- The "Import Summary" box will appear indicating the results of your import - Click OK. The imported student data will now appear on the STUDENT DATA screen.
IMPORT STUDENT DATA: SEMESTER 2 - IMPORT STUDENT DATA: SEMESTER 2 - (THIRD TAB on the STUDENT DATA screen) - This option imports semester 2 performance data. To perform this import, follow these steps:
- Click the "Import Semester 2 Data" button on the STUDENT DATA screen (THIRD TAB).
- The INSTRUCTIONS screen will appear (see below). Read the instructions and click "Import Student Data". At this point you should be able to position the "Open File" dialog box that appears so that you can read the instructions on the INSTRUCTIONS screen while you perform the import process.
Please note that this import option is identical with the first import option EXCEPT for step 3D - UNCHECK the box "Add remaining data as new records". Failure to UNCHECK this box on importing semester 1 or 2 data could results in extraneous data being imported into the database. By contrast, this box should ALWAYS be CHECKED when performing the first import option from the FIRST TAB of the STUDENT DATA screen or upon creation of a new cohort.
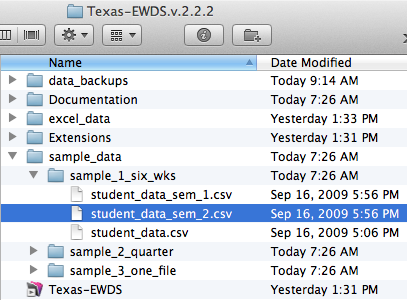
- Select the data source file from the "Open File" dialog window as shown below (navigate to the student data file - student_data_sem_1.mer or .csv - and click "Open"). If the file is not selectable, change the "Show:" drop-down list to "All Available".
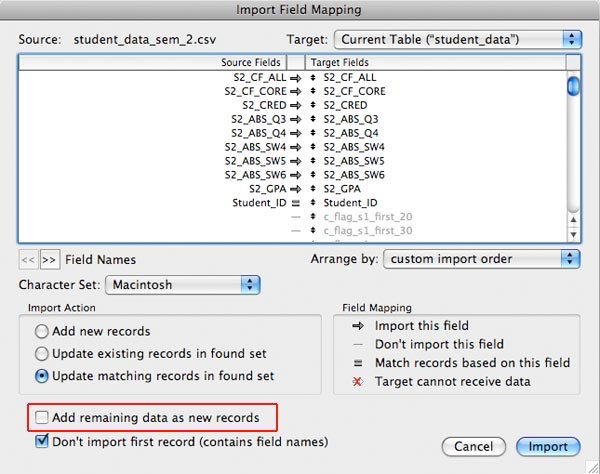
- In the "Import Field Mapping" dialog window (shown below):
- Select Arrange by: "matching names"
- Select Character Set: Windows or Macintosh (based on which version of the EWDS you are using)
- Select "Update matching records in found set"
- Click the arrow next to the "Student_ID" field to change it to an equal sign "=" (NOTE: this will change the "Arrange by:" drop-down list to "custom import order" - this is correct)
- UNCHECK the box "Add remaining data as new records" - NOTE: THIS STEP IS THE OPPOSITE OF THE FIRST IMPORT OPTION!
- CHECK the box "Don't import first record (contains field names)"
- Click "Import"
- CHECK the box "Perform auto-enter options while importing"
- The "Import Summary" box will appear indicating the results of your import - Click OK. The imported student data will now appear on the STUDENT DATA screen.
- IMPORT STUDENT DATA: SINGLE FILE OPTION - (FIRST TAB on the STUDENT DATA screen) - This option imports all available student data including names, IDs, and semesters 1 and 2 performance data.
As new data become available for import into the database, a single .csv file can be updated with the new data. This can be a simpler option as the newly available data can simply be added as new columns or appended to the most recent source file. The updated file can then be re-imported into the EWDS. To perform this import, follow these steps:
- Upon cohort creation, select "OK" to begin the import process. If you are importing at some later time after cohort creation, click the "Import Student Data" button on the STUDENT DATA screen (FIRST TAB).
- The INSTRUCTIONS screen will appear (see below). Read the instructions and click "Import Student Data". At this point you should be able to position the "Open File" dialog box that appears so that you can read the instructions on the INSTRUCTIONS screen while you perform the import process.
- Select the single-source file from the "Open File" dialog window. Navigate to the specified file and click "Open" - the single-source file from the application's "sample_data" folder is shown below (student_data_q.csv or student_data_sw.csv). If the file is not selectable, change the "Show:" drop-down list to "All Available".
- In the "Import Field Mapping" dialog window:
- Select Arrange by: "matching names" (NOTE: This option will have more source fields listed as this single-source file will contain all current student data.)
- Select Character Set: Windows or Macintosh (based on which version of the EWDS you are using)
- Select "Update matching records in found set"
- Click the arrow next to the "Student_ID" field to change it to an equal sign "=" (NOTE: this will change the "Arrange by:" drop-down list to "custom import order" - this is correct)
- CHECK the box "Add remaining data as new records"
- CHECK the box "Don't import first record (contains field names)"
- Click "Import"
- CHECK the box "Perform auto-enter options while importing"
- The "Import Summary" box will appear indicating the results of your import - Click OK. The imported student data will now appear on the STUDENT DATA screen.
- Need help importing student data?
Many campuses may not have a designated IT or technical staff person who can provide your student data in the proper format as described in the EWDS Data Requirements document referenced above. If you need assistance importing your student data, contact ewaters@air.org. You may have some data files available for your students but you aren't sure how to format these files for compatibility with the EWDS. If this is the case, we can help you convert these files to the right format for import. If you are able to e-mail your files to us, we can convert them to the right format and send them back to you. Let us know if you need this assistance.
Viewing cohort data - Viewing cohort data
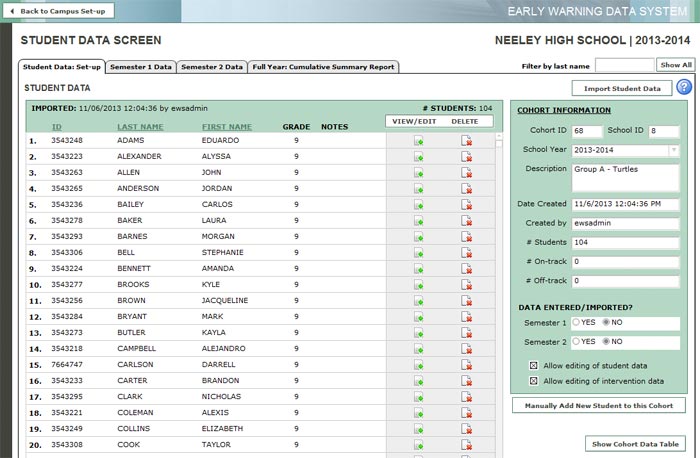
Cohort data can be viewed using the STUDENT DATA screen as shown below. If you successfully performed the import process, you should see a list of students on the first tab - Student Data: Set-up. If you chose to enter data manually, the STUDENT DATA screen will not contain any student data (as shown below).
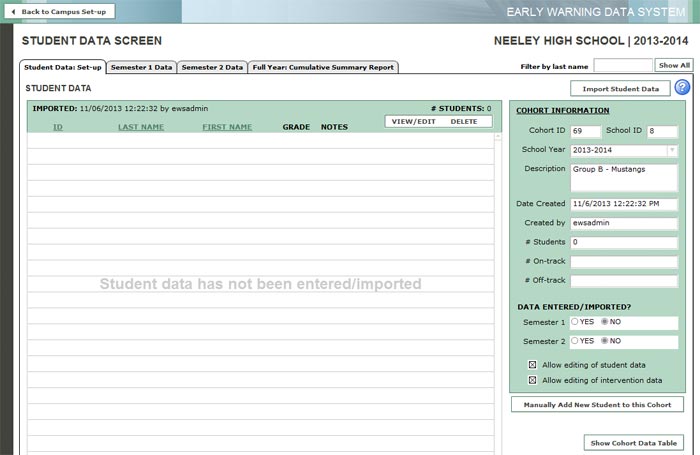
The STUDENT DATA screen contains the following 4 tabs:
FIRST TAB: Student Data: Set-up - Use this tab to view student names, manually add students to the cohort, delete students from the cohort, view or edit student details, edit the Cohort Information, or view a spreadsheet-like data table for the students in the current cohort. Click the blue help button for additional instructions and information about this screen (shown below).
SECOND TAB: Semester 1 Data - Use this tab to view or edit semester 1 performance data for the selected cohort. Click the blue help button for additional instructions and information about this screen (shown below).

THIRD TAB: Semester 2 Data - Use this tab to view or edit semester 2 performance data for the selected cohort. Click the blue help button for additional instructions and information about this screen (shown below).

FOURTH TAB: Full Year: Cumulative Summary Report - Use this tab to view the "at-risk" flags and indicator fields for the selected cohort. Click the column headings to view a detailed definition for any indicator or "at-risk" flag. Click the "Show Cohort Data Table" button to view a spreadsheet-like data table for the students in the current cohort. Click the blue help button for additional instructions and information about this screen (shown below).
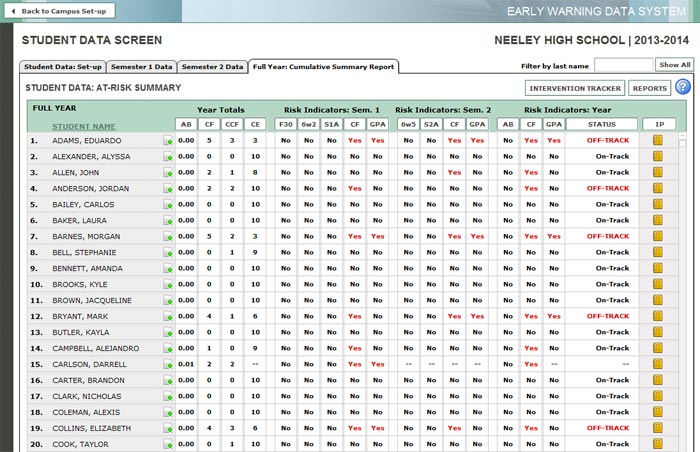
KEY:
Viewing student details
"--" - indicates no data entered or imported for the indicator
"??" - indicates data are out of range for the indicator (example: more absences than number of days in the semester) - Viewing student details
Detailed student data can be viewed and edited on the STUDENT DETAILS screen. To access this screen, click the VIEW/EDIT option on the STUDENT DATA screen (FIRST TAB) next to the student you wish to view. This screen can also be accessed by clicking on a student's name from the SECOND, THIRD, or FOURTH TABS.
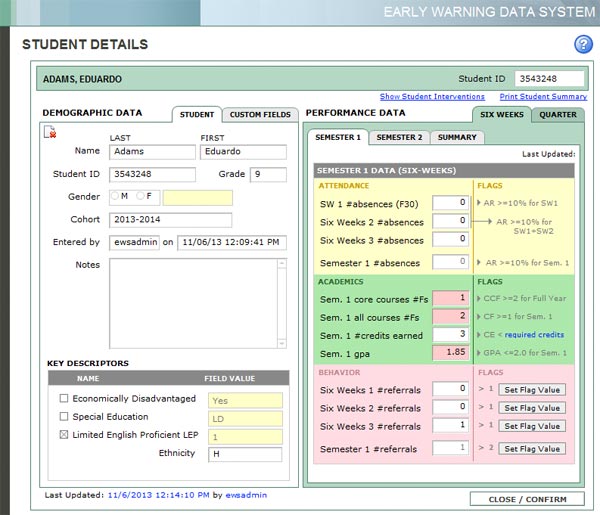
The STUDENT DETAILS screen is divided into Demographic and Performance sections as follows:
DEMOGRAPHIC DATA:
This section of the STUDENT DETAILS screen contains 2 tabs - STUDENT and CUSTOM FIELDS. The STUDENT tab contains basic demographic information including student name, ID, grade, gender, and cohort. Additionally, this section includes key descriptors such as Economically Disadvantaged, Special Education, LEP, and Ethnicity. The CUSTOM FIELDS tab includes up to 5 custom fields that can be defined for tracking additional student data indicators. For instructions on setting up custom fields, see Defining custom student fields.PERFORMANCE DATA:
This section of the STUDENT DETAILS screen also contains 2 tabs - SIX WEEKS and QUARTER. The campus reporting period selected during the campus set-up process determines which tab is active and which tab is inactive. Both SIX WEEKS and QUARTER tabs contain 2 sub-tabs - SEMESTER 1 and SEMESTER 2. These sub-tabs contain the actual data fields representing the attendance, academic, and behavior data for that period.The following chart shows the student performance data field definitions and flag values by reporting period and semester - in the order they appear on the STUDENT DETAILS screen.
QUARTERLY REPORTING PERIOD:
Semester 1 Semester 2 Field Definition Flag criteria S1_ABS_F20 #absences in first 20 days >10% (>2) S1_ABS_Q1 #absences in quarter 1 >10% S1_ABS_Q2 #absences in quarter 2 N/A S1_ABS_TOTq #absences in semester >10% S1_CF_CORE #core course Fs >=2 - full year S1_CF_ALL #course Fs (all) >=1 S1_CRED credits earned in semester < required S1_GPA GPA for semester <=2.0 S1_BEH_Q1 #referrals in quarter 1 user defined S1_BEH_Q2 #referrals in quarter 2 user defined S1_BEH_TOTq #referrals in semester user defined Field Definition Flag criteria S2_ABS_Q3 #absences in quarter 3 >10% S2_ABS_Q4 #absences in quarter 4 N/A S2_ABS_TOTq #absences in semester >10% S2_CF_CORE #core course Fs >=2 - full year S2_CF_ALL #course Fs (all) >=1 S2_CRED credits earned in semester < required S2_GPA GPA for semester <=2.0 S2_BEH_Q3 #referrals in quarter 3 user defined S2_BEH_Q4 #referrals in quarter 4 user defined S2_BEH_TOTq #referrals in semester user defined SIX WEEKS REPORTING PERIOD:
Semester 1 Semester 2 Field Definition Flag criteria S1_ABS_SW1 #absences in 6-wks 1 >10% (>3) S1_ABS_SW2 #absences in 6-wks 2 >10% S1_ABS_SW3 #absences in 6-wks 3 N/A S1_ABS_TOTsw #absences in semester >10% S1_CF_CORE #core course Fs >=2 - full year S1_CF_ALL #course Fs (all) >=1 S1_CRED credits earned in semester < required S1_GPA GPA for semester <=2.0 S1_BEH_SW1 #referrals in 6-wks 1 user defined S1_BEH_SW2 #referrals in 6-wks 2 user defined S1_BEH_SW3 #referrals in 6-wks 3 user defined S1_BEH_TOTsw #referrals in semester user defined Field Definition Flag criteria S2_ABS_SW4 #absences in 6-wks 4 >10% S2_ABS_SW5 #absences in 6-wks 5 >10% S2_ABS_SW6 #absences in 6-wks 6 N/A S2_ABS_TOTsw #absences in semester >10% S2_CF_CORE #core course Fs >=2 - full year S2_CF_ALL #course Fs (all) >=1 S2_CRED credits earned in semester < required S2_GPA GPA for semester <=2.0 S2_BEH_SW4 #referrals in 6-wks 4 user defined S2_BEH_SW5 #referrals in 6-wks 5 user defined S2_BEH_SW6 #referrals in 6-wks 6 user defined S2_BEH_TOTsw #referrals in semester user defined The flag criteria columns in the above charts indicate the threshold values triggering a performance flag for each indicator. If the flag criteria lists "N/A", no criteria is specified for that indicator. If the flag criteria lists "user defined", a user-entered value will be used to trigger flags for those indicators. Most performance flags trigger based on the single field they are associated with, however some flags trigger in tandem with other indicators such as the number of core course Fs (S1_CF_CORE) which triggers if there are more than 2 core course failures for the entire year (S1_CF_CORE + S2_CF_CORE). Any fields whose values are flagged will be shown in red as illustrated in the STUDENT DETAILS screen above.
Defining custom fields - Defining custom fields
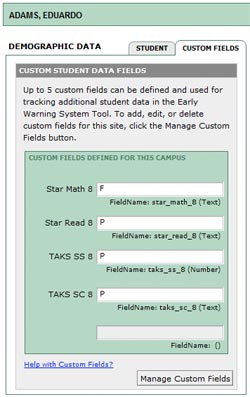 The EWDS allows up to 5 custom fields that can be defined for tracking additional student data that may be of interest to campuses or districts. These fields are listed on the STUDENT DETAILS screen in the CUSTOM FIELDS tab. By default, there
are no custom fields defined. Undefined custom fields appear "grayed out" in the CUSTOM FIELDS tab. In the example shown to the right, there are 4 custom fields defined to track 8th grade TAKS scores for Social Studies and Science and 8th grade Star scores for Math and Reading. The 5th
custom field has not been defined.
The EWDS allows up to 5 custom fields that can be defined for tracking additional student data that may be of interest to campuses or districts. These fields are listed on the STUDENT DETAILS screen in the CUSTOM FIELDS tab. By default, there
are no custom fields defined. Undefined custom fields appear "grayed out" in the CUSTOM FIELDS tab. In the example shown to the right, there are 4 custom fields defined to track 8th grade TAKS scores for Social Studies and Science and 8th grade Star scores for Math and Reading. The 5th
custom field has not been defined.
To define new custom fields, perform the following steps:
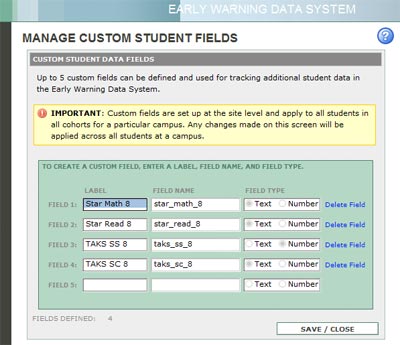
- On the CUSTOM FIELDS tab, click the "Manage Custom Fields" button. The MANAGE CUSTOM STUDENT FIELDS screen will appear as shown below.
- Beginning with the first custom field, enter the field labels for up to 5 custom fields. A field name and type will be automatically entered. Note that field labels have a limit of 12 characters.
- Click the CLOSE/CONFIRM button to return to the STUDENT DETAILS screen.
- You are now able to enter data into your custom fields.
ABOUT CUSTOM FIELDS:
Custom fields are defined at the "site" level in the database. This means that any changes made on the MANAGE CUSTOM STUDENT FIELDS screen will apply to all students across all cohorts at a particular campus. This allows custom fields to be set up once and available across all cohorts in a campus.DELETING CUSTOM FIELDS:
Tracking student interventions
To delete a custom field, click the "Delete Field" link next to the custom field on the MANAGE CUSTOM STUDENT FIELDS screen. Keep in mind however, that deleting a custom field will remove all data that may have been entered for that custom field across all cohorts. If your custom field simply needs to be re-labeled, click the field name in the CUSTOM FIELDS tab next to that field to modify the field label. - On the CUSTOM FIELDS tab, click the "Manage Custom Fields" button. The MANAGE CUSTOM STUDENT FIELDS screen will appear as shown below.
- Tracking student interventions
The EWDS can track key information regarding student interventions that may occur as a result of a student being identified as "at risk" by one or more indicator flags. The interventions tracked can also represent interventions that students may have had prior to entering 9th grade.
To record an intervention for a student, perform the following steps:
- On the STUDENT DETAILS screen, click the "Show Student Interventions" link at the top right. The STUDENT DETAILS: INTERVENTION PLAN screen will appear as shown below.

- Click "Add intervention".
- Enter the details for the intervention including name, category, dates, and description.

- Click the CLOSE/CONFIRM button to return to the previous screen. Note: Interventions can be deleted from this screen using the delete button on the bottom left corner.
The STUDENT DETAILS: INTERVENTION PLAN screen can also be accessed from the STUDENT DATA screen (tab 4) by clicking the "IP" icon next to the selected student (far right column).
INTERVENTION SUMMARY REPORT
To print a report of interventions for a particular student, click the "Print Interventions Report" link on the STUDENT DETAILS: INTERVENTION PLAN screen.
Intervention strategies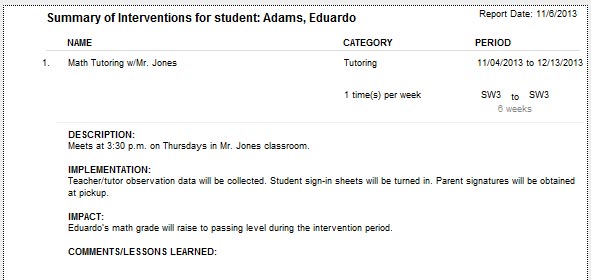
- On the STUDENT DETAILS screen, click the "Show Student Interventions" link at the top right. The STUDENT DETAILS: INTERVENTION PLAN screen will appear as shown below.
- Intervention strategies
To view a list of resources for effective research-based intervention strategies, click the "Intervention Strategies for Drop-out Prevention" link on the STUDENT DETAILS: INTERVENTION PLAN screen. Select a resource from the list to view the full description of the resource including a link to the resource web site. The list of resources provided is by no means comprehensive but may provide a good place to begin researching student interventions that would work best for your campus or district.
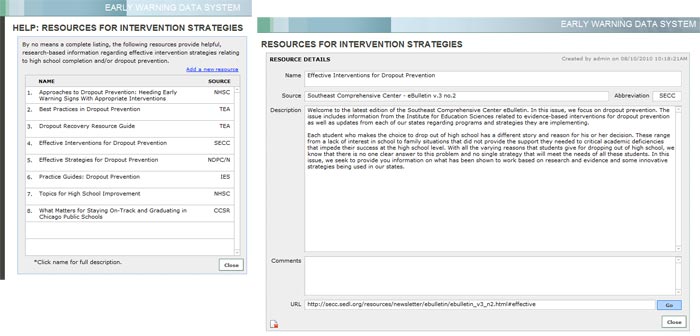
Use the Comments field on the RESOURCE DETAILS screen to enter personal comments or notes relating to the resource or to indicate which resources may be useful to your campus or district.
Intervention Tracker - Intervention Tracker
INTERVENTION CATEGORIES:
Intervention types (or categories) are used to categorize student interventions into groups. Each category is then summarized to show student performance outcomes across the duration of the intervention period. Click the category icon to view a summary of interventions within that group.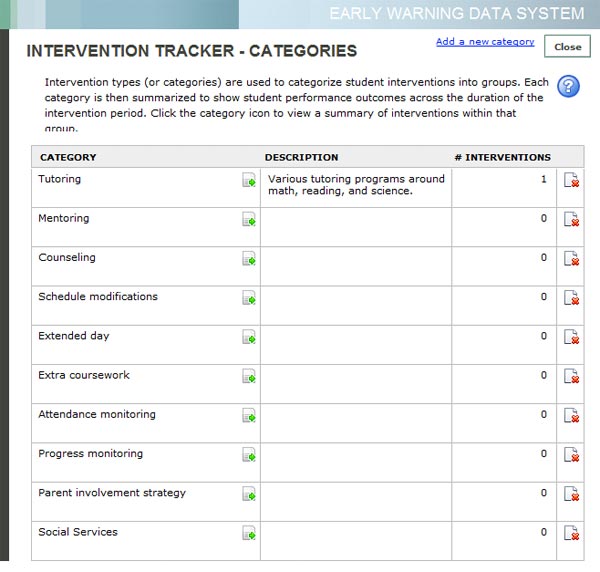
The number of interventions recorded in the system under each category is listed in the right column. The category summary screen provides a way to guage the potential success or impact of various intervention strategies based on student performance before, during and after the period of the intervetion.
To add a new intervention category, click the "Add a new category" link and enter the category name. A description can be added after the new category is created. Use the delete icon to delete a category you have added.
CATEGORY SUMMARY SCREEN:
Use this screen to view interventions recorded for specific categories. For example, you might view all interventions in the "Tutoring" category. For each set of interventions listed, the Category Summary screen displays the intervention period (the blue line) overlayed on student performance data. This can help schools determine which types of interventions are most effective for their students in the areas of attendance, academics, and behavior.PRINTING A CATEGORY SUMMARY REPORT:
- Click the tab for the data you wish to view: attendance, academics, or behavior.
- Click the Category Summary Report icon at the top right of the tab area to print a summary of the interventions listed.
Select from the intervention type drop-down list to view another category. Click the "Edit categories" link to edit, create, or delete categories.
Pre-defined reports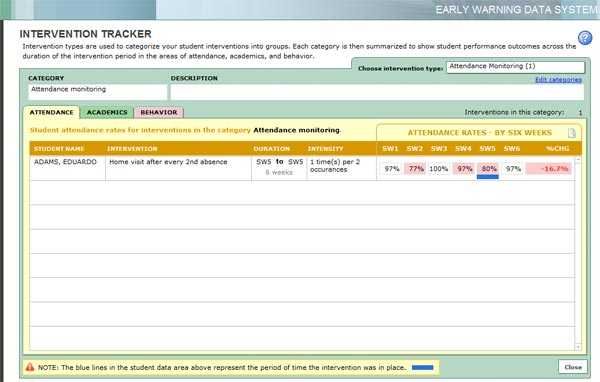
- Pre-defined reports
The EWDS provides several pre-defined standard reports as well as custom reporting options. Each pre-defined report displays the indicator flags which appear on the STUDENT DATA screen (FOURTH TAB) - CUMULATIVE SUMMARY REPORT. If a performance flag has been triggered, that field will display "YES" in bold red text.
To access the Reports menu click the REPORTS button from any of the four tabs on the STUDENT DATA screen.
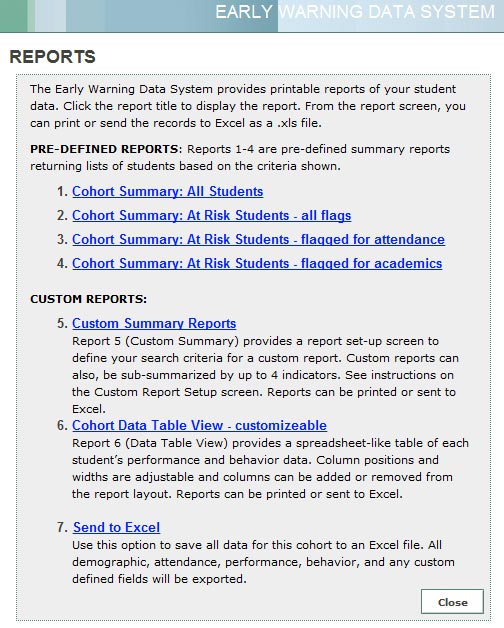
PRE-DEFINED REPORTS:
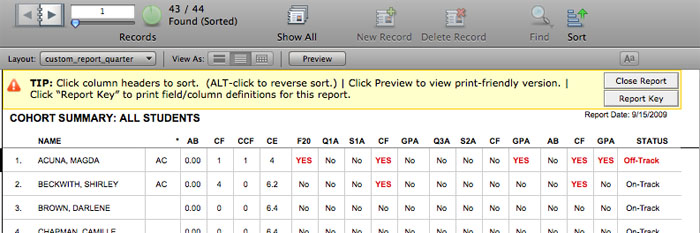
Each pre-defined report displays the same report screen but with a difference set of records based on the report selected. The report title changes to reflect the selected report. Report titles can be edited by simply clicking on the title and making changes. Each of the report options listed below applies to all the following pre-defined reports:- COHORT SUMMARY: ALL STUDENTS - Lists all students in the selected cohort.
- COHORT SUMMARY: AT-RISK STUDENTS: ALL FLAGS - Lists all students in the selected cohort who have performance flags that have triggered for 1 or more indicators.
- COHORT SUMMARY: AT-RISK STUDENTS: FLAGGED FOR ATTENDANCE - Lists all students in the selected cohort who have performance flags that have triggered for 1 or more attendance indicators.
- COHORT SUMMARY: AT-RISK STUDENTS: FLAGGED FOR ACADEMICS - Lists all students in the selected cohort who have performance flags that have triggered for 1 or more academic indicators.
REPORT OPTIONS (see example report below):
- Sorting data: Pre-defined reports are sorted by student last name by default. However, reports can be re-sorted by clicking on the appropriate column heading. To sort in the reverse order, ALT-click on the column heading.
- Print preview: To view how a report will look when printed, click the "Preview" button. Depending on the printer settings for your computer, you may need to adjust the page setup or orientation to accommodate the report. To adjust the print layout, click "Print Setup" (Windows) or "Page Setup" (Mac) in the toolbar when in "Preview" mode. Click the "Exit Preview" button to return to viewing your report.
- Printing: To print a report, click the "Preview" button, then click the "Print" button in the toolbar. Make sure your print settings indicate that you are printing "Records being browsed" (this should be the default setting).
- Report key: To print a report key displaying the column names and definitions, click the "Report Key" button, then click the "Print" button in the toolbar.
- Sending reports to Excel: The EWDS allows each of the pre-defined reports to be sent to Microsoft Excel. To open a report in Excel, perform the following steps:
- Click the "Preview" button to view your report in print preview mode.
- Click the "Save as Excel" button in the toolbar.
- Type a name for the new Excel file in the "Save Records As Excel" dialog box.
- Select a folder on your computer to save the new Excel file.
- Choose the options "Save: Records being browsed" and check the box "Automatically open file".
- Click the Save button. The report will open and display in Excel.
NOTE: Sending a report to Excel requires that your computer has Microsoft Excel installed.
- Custom summary reports
In addition to the 4 pre-defined standard reports, the EWDS also provides a custom summary report option which allows the user to enter multiple search criteria to return a specific sub-set of student records. Search criteria are entered on the CUSTOM REPORT SETUP screen. Custom reports can also be "sub-summarized" by additional demographic fields to provide sub-group comparisons and rank-order lists within sub-groups.
To access the CUSTOM REPORT SETUP screen click on "Custom Summary Reports" (report 5) on the REPORTS screen.
ENTERING SEARCH CRITERIA:
Use this screen set up a custom report for the current cohort. Use the search criteria fields to enter values to limit or fine-tune your search. All cohort records will be queried based on your search criteria and the resulting sub-set of cohort records will display on the custom report. In the example screen below, this report will return students with more than 1 absence in semester 1 and 1 or more behavior referrals in semester 1 grouped by gender and ethnicity.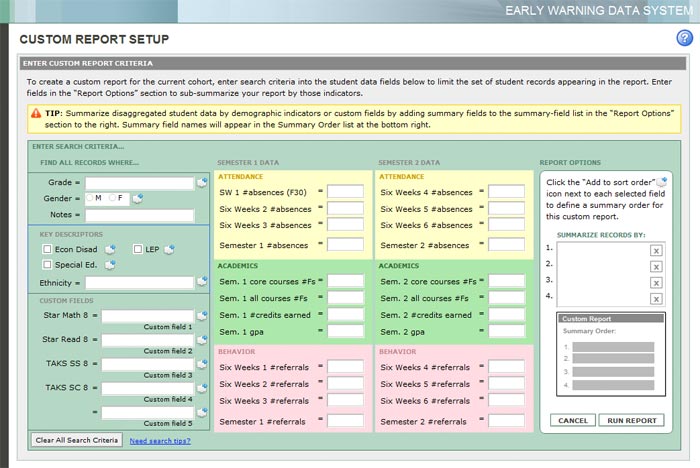
USING WILDCARDS AND SEARCH OPERATORS:
For numeric or text fields, the following search operators can be used to limit results:Operator Field Type Example "<" numeric Enter "<2" to return all records with a value less than 2 for that field. ">" numeric Enter ">0" to return all records with a value greater than 0 for that field. "..." numeric Enter "2...4" to return all records with value falling within the range 2 to 4 for that field. "*" text (wildcard) Enter "Sm*" to return all records with values beginning with "Sm" for that field. DESIGNATING A SORT-ORDER FOR SUB-SUMMARIZING THE REPORT:
Use the Report Options section on the right to identify the fields by which to summarize the report. Fields that are available for use in sub-summaries are indicated with the "Sort Order" icon next to the field. - "Sort Order" icon.
To add a field to the sub-summary list, click the icon next to that field. Up to four sub-summary fields can be selected for a report. To remove a field from the sub-summary list, click the "x" button next to the field. To display your report in list view (un-summarized), leave the sub-summary list blank when running the report.
Using the example report criteria above, the following custom summary report would be generated (notice the title has been re-named manually to reflect the content of the custom report):
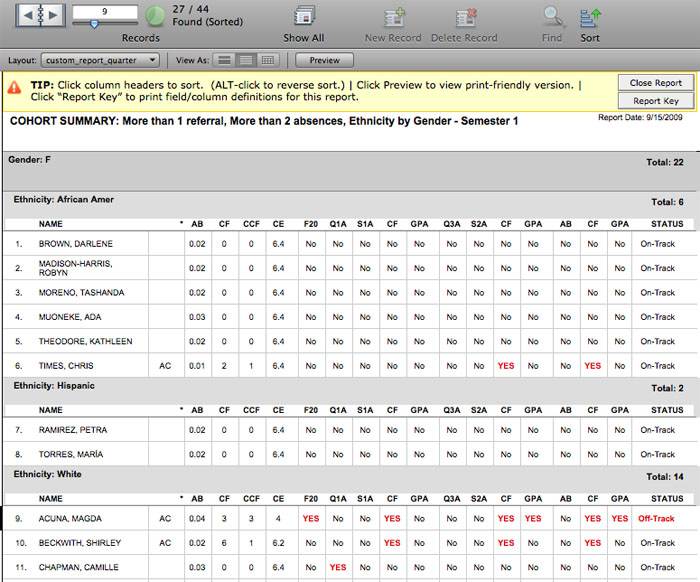
All the report options listed for pre-defined reports - sorting, print preview, printing, report key, and sending to Excel - are available for custom reports as well. In Preview mode, the example report would display as follows (notice the "Save as Excel" and "Page Setup" buttons). Also note that in Preview mode, report pages can be viewed using the "Pages" tool at the top left to move between pages of the report.
Viewing student data tables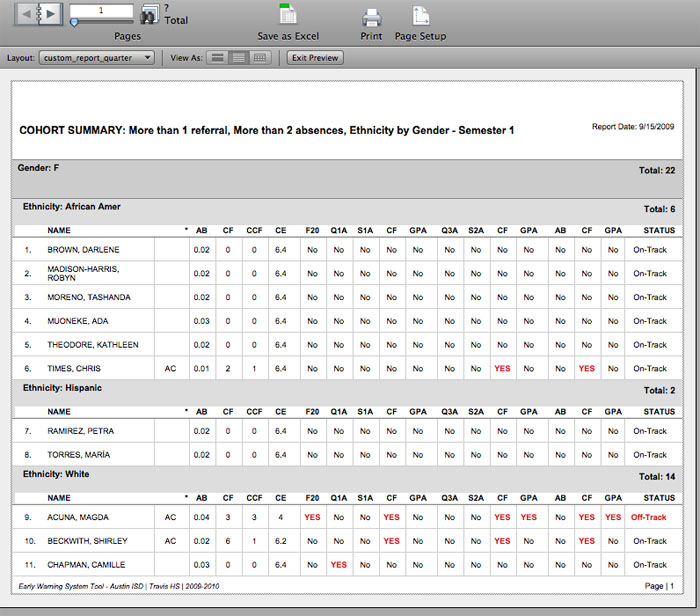
- Viewing student data tables
For users who prefer viewing student data in a spreadsheet-like table similar to Excel, the EWDS provides the Cohort Data Table View option from the REPORTS screen. This option is also accessible from the FIRST and FOURTH TABS of the STUDENT DATA screen.
To access the Cohort Data Table screen click on "Cohort Data Table View - customizable" (report 6) on the REPORTS screen.
VIEWING AND SORTING DATA:
The fields available on this screen are the actual data fields imported or entered for each student relating to attendance, academics, and behavior. Click the column headers once to sort in ascending order and click again to sort in descending order. The ALT key is not required for reverse-sorting on this screen.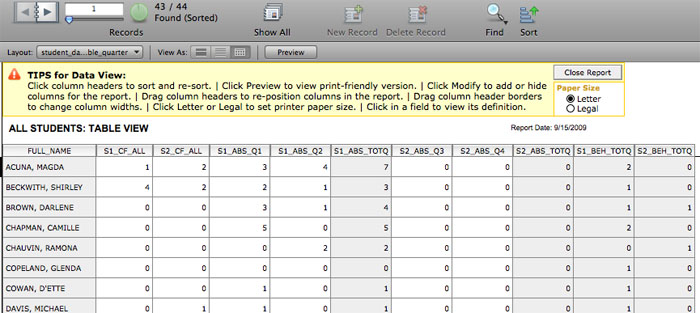
MODIFYING THE TABLE:
The fields and columns appearing in table view can be changed and re-positioned as required to display the specific view desired. The following modifications can be made in table view:- ADDING/REMOVING COLUMNS: To add or remove columns to the table view screen, perform the following steps:
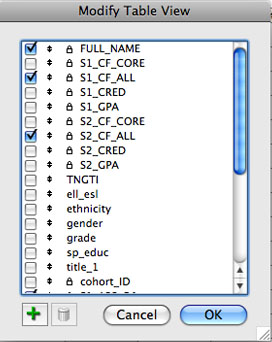
- Click the "Modify" button at the far right to display the "Modify Table View" window.
- Check the fields you wish to display on screen; uncheck the fields you wish to hide from view.
- To add additional fields not on the default field list, click the green "+" at the bottom of the window to display a list of all cohort fields. Keep in mind however, that many of the fields in the "all fields" list are control fields that may not be relavent to your data.
- When the correct columns appear on your table view screen, click OK.
- RE-POSITIONING COLUMNS: To change the order in which columns appear on the table view screen, simply click and drag the column header left or right to the desired location.
- ADJUSTING COLUMN WIDTH: To change the width of columns appearing on the table view screen, simply click and drag the border between column headers left or right to re-size the columns. You can also hold SHIFT, select multiple columns, then adjust the width of all selected columns at the same time.
MODIFYING THE RECORD FOUND SET:
Expanding or constraining the found set of records that appear in table view can be accomplished 2 ways:- USING THE FIND TOOL: To change the found set using the Find tool, perform the following steps:
- Click the "Find" button on the toolbar.
- Enter search criteria in any of the fields on the screen.
- Press "Enter" or "Return" to perform the query. Your new found set will appear.
- USING CONTEXTUAL MENUS:
- Right-click on any value in any field on the screen.
- Select "Find Matching Records" (finds all records matching the value selected), "Constrain Found Set" (limits the found set of records to only those matching the value selected), or "Extend Found Set" (expands the found set of records to include those matching the value selected) to initiate those queries.
- Your new found set will appear.
ADJUSTING THE PRINT PAPER SIZE:
Individual student reports
Depending on the number of columns on the screen and their widths, the page setup may need to be adjusted from Letter to Legal or vice versa. To make this adjustment click the Letter/Legal buttons at the top of the report to display the columns in print preview. Once in "Preview" mode, additional adjustments can be made by clicking the "Print Setup" or "Page Setup" buttons and adjusting the Scale percentage to accommodate more columns if necessary. The default print scale percentage should be 100%. - ADDING/REMOVING COLUMNS: To add or remove columns to the table view screen, perform the following steps:
- Individual student reports
Individual student summary reports can be accessed from the STUDENT DETAILS screen by clicking on the "Print Student Summary" option on the top right.
Student summary reports display all performance data (attendance, academics, and behavior) for both semesters 1 and 2. If a particular indicator has triggered a performance flag, a warning indicator will display next to that indicator.
Saving student reports to an Excel spreadsheet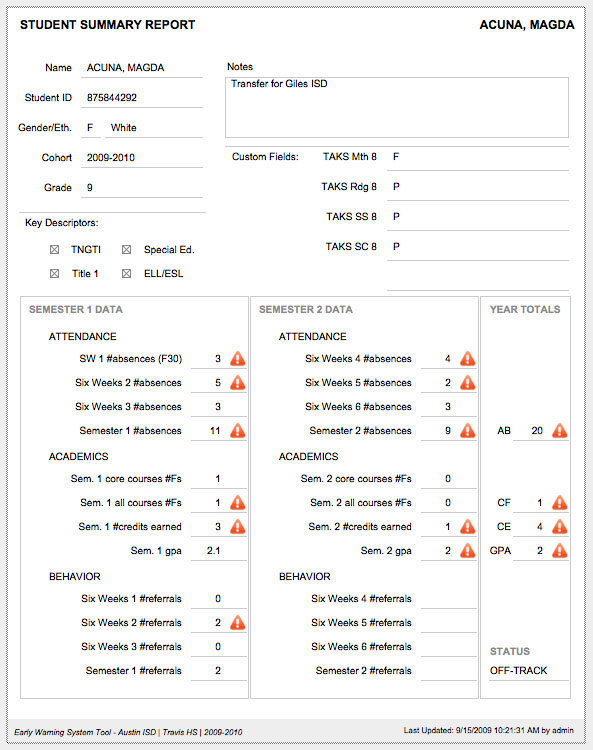
- Saving student reports to an Excel spreadsheet
Exporting student data to an Excel spreadsheet can be performed from any of the reports available in the EWDS. To save your student data to an Excel file, first view the pre-defined report, custom report, or data table containing the data you wish to save, then perform the following steps:
- From the report screen, click the "Preview" button on the toolbar at the top. The report will enter preview mode and the "Save as Excel" button will appear on the toolbar.
- Click "Save as Excel".
- Name the Excel file and choose a location to save it. If you want to open the file immediately, select the checkbox "Automatically open file".
- In the EWDS, click "Exit Preview" to exit the report.
- Sending all student data to an Excel spreadsheet
In addition to saving specific student reports to an Excel spreadsheet, all student data for a cohort can be opened directly in Excel by performing the following steps:
- From the report menu, select the "Send to Excel" option (report 7).
- Name the Excel file and choose a location to save it. If you want to open the file immediately, select the checkbox "Automatically open file".
